Friday, February 19, 2010

Who Doesn't Like Fish Tacos?


Look at that face. Lovin' me some Mahi tacos. You know it's good cause there's some juice dripping out the back. Notice the raised pinky finger. Feel like replicating this moment of intense satisfaction in your own home?

You will need:
1 lb mahi mahi fillet
2 tablespoons olive oil
3 garlic cloves
Juice of 2 limes
1 teaspoon fresh picked thyme
Salt and pepper

2 ripe avocados
1 beefsteak tomato
1 medium onion, halved
1 jalapeno, diced
1/4 cup cilantro, chopped roughly

1/2 bag pre-shredded coleslaw mix (no, I have no problem using this)
1 tablespoon honey
2 tablespoons cider vinegar
2 tablespoons minced fresh rosemary

6 corn tortillas
As much cotija cheese as you can handle


I began by skinning and cleaning my mahi fillet and portioning it into six pieces as even as I cared to cut them. Then I threw those bad boys together in a bowl with the juice of one lime, some olive oil, fresh thyme, one sliced garlic clove and plenty of salt and pepper.

There's a special section of my brain that is devoted entirely to making, perfecting and adoring guacamole. The avocados I picked out weren't too ripe so this is more like a pico with chunks of avocado. 1 chopped tomato, 1/2 a diced onion, 1 minced garlic clove, cilantro, 1 jalapeno, salt, pepper, plenty of fresh squeezed lime juice.

The slaw was LC's idea, and a great one at that. But we didn't have any mayo so this was more of a tangy/sweet slaw than a creamy. I think everything worked out for the better. Cole slaw mix, honey, cider vinegar, garlic, 1/2 sliced onion, salt, pepper.

This is how my grandmother used to heat tortillas, right over the open gas flame, turning them with her bare hands. It's my favorite way to do it too because the edges get just a little burnt. Careful not to leave them over the heat for too long though.

Nothing special with the fish here. HIGH HEAT saute with a little bit of olive oil until they look...

...deliciously caramelized. The trick is to not touch the fish once it has entered the pan. Once a nice crust has formed it will release on its own. Turn and repeat. Golden brown and delicious.

Three tacos each. Fish, slaw, guac, and again, as much cotija cheese as your little heart desires. Till next time, happy eating.

Monday, February 15, 2010

Smoked Pork Belly and Shitakes with Curried Pork Fat Potatoes


I love living in a neighborhood populated by lots of different cultures. One of the most obvious (to me at least) signs of this melting pot is the selection of variety meats on the grocery store shelves. Where most would only find steaks, chops and roasts, my Key Foods has calf heart, veal brains and one of my favorite things in the world, pork belly. Some of you may know it as chicharron, but you may as well call it bacon steak because that's what it is. A slab of fat with a little meat and delicious skin that gets crunchy when you cook it. I did mine a little Texas/Asian fusion and smoked the belly then braised it with shitakes, ginger and a jalapeno.

You will need:
1/2 lb pork belly
1/2 cup
2 tablespoons butter
1 medium onion, sliced thin
10-12 shitake mushrooms, stems removed
3 gloves garlic
1 small piece of ginger (see pic)
1 jalapeno
1 tablespoon chili paste
1 teaspoon soy sauce
1 teaspoon fish sauce
1 teaspoon mirin
1 of your favorite beers, not too bitter

1 lb red potatoes, halved
2 tablespoons curry powder
1/4 cup pork fatback, diced
Salt and pepper

Making a homemade smoker out of a wok or any other deep pot or pan is so simple you'll slap yourself for not barbecuing indoors more often. Then again my apartment still smells like bacon three days later so, your choice.

Line the bottom of your wok with three large pieces of aluminum foil. Make sure there's no wok surface exposed. Make a pouch out of foil and put in your chips. Place the pouch in the bottom of the wok and a roasting rack over it. Place the belly on the rack, season with salt and pepper and cover tightly with more crimped aluminum foil. Make sure there's a good seal or you'll end up like me with a smoky kitchen. Turn the heat on low and leave it there for one hour.

In the meanwhile, slice one white onion...

...de-stem and slice the shitake mushrooms...

...mince the garlic, ginger and jalapeno...

...and begin to sweat them in the butter with the chili paste, soy and fish sauces and mirin until the onions are soft and translucent.

After the belly has smoked for an hour, cut it into large lardons and throw it in with the veg.

Deglaze the pot with your favorite beer. I used Lighthouse Ale. It's brewed on Fire Island and it's delicious. Season, bring to a boil, drop to a simmer, cover and braise for six hours.

After five hours, begin prepping the potatoes. Render your pork fat in a large cast iron skillet until almost all of it is liquid. Toss potatoes in salt, pepper and curry powder and then toss in the fat. Make sure everything's nice and shimmery. Roast in a 400 degree oven for one hour.

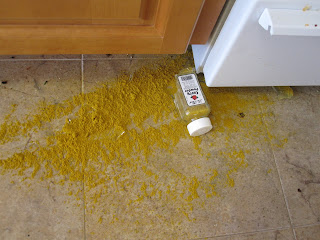
Oops. Good thing I already used what I needed. Better sweep that up before the gf gets home.

After six hours, remove the pork belly and simmer the braising liquid to reduce it. This is going to be a luxurious sauce that our pork and potatoes will swim in.

In a large pan over high heat, sear the pork belly till it's brown and crispy on all sides.

This is what the potatoes should look like after an hour in the oven. I like to smash mine up a bit. Gives the dish a rustic feel.

And here's the finished product. Potatoes on the base, a few chunks of belly, as slather of sauce and mushrooms. The garnish on top is crushed pork rinds, just like you get at the corner store. I'm not above it and you shouldn't be either. It looks good and adds a whole new dimension to the dish.

Thursday, February 11, 2010

Valentine's Day: Hazelnut Candy Bar Pie with Bailey's Whipped Cream

Here's a Valentine's Day dessert for all you romantics. I made it for LC's birthday and we could only eat one slice of the thing. It's so rich, I almost called it Ganache Pie because it's basically a hazelnut ganache topped with whipped cream. Enjoy

You will need:
1 large package of Oreo's
2 tablespoons butter
2 cups 60% cacao chocolate chips
1 hazelnut chocolate bar with chopped hazelnuts
1 jar Nutella
2 pints cream
Half cup sugar
Half cup Bailey's Irish Cream
Cocoa powder for dusting


Begin by eating an Oreo cookie in one bite. Repeat five times. Put the rest of the Oreo's along with two tablespoons of butter in the bowl of a food processor and pulse until you have a coarse meal. Butter a pie dish and press the crushed cookies into the bottom and sides of the pie tin. Make sure they're firmly packed. Bake at 350 degrees for fifteen minutes.

This stuff is a gift from heaven which is why I put an entire jar in this recipe. Empty the whole thing out into a bowl along with 2 cups bittersweet or 60% cacao chocolate chips, one half cup cream and one hazelnut chocolate bar with hazelnuts in it. Boil two inches of water in a medium sauce pot and turn down to a simmer. Set the bowl over the simmering water and wait for the chocolate to melt, about five minutes.


While the chocolate is melting, whip three and a half cups cream to stiff peaks.


Make sure it doesn't get everywhere!


Should look something like this.


Here is our chocolate mixture melting over a double boiler.


In a small sauce pan, combine one half cup sugar with one half cup Bailey's Irish cream and simmer until the sugar is dissolved and has begun to brown.


Drink some of the Bailey's while nobody's looking. With the mixer on low, slowly drizzle in your Bailey's and sugar until fully incorporated into the whipped cream.


Pour the melted chocolate into the baked pie crust and refrigerate for two hours to the chocolate will harden. For best results, remove from the fridge, ten minutes before topping with the whipped cream and slicing.


Load a pastry bag with a star tip and the whipped cream and get to piping.


Pipe in a spiral and build up the middle. Don't worry about how it looks now, on the plate it will look fantastic.


Slice into eighths and dust with cocoa powder and crushed Oreo's.

Saturday, February 6, 2010

Tortilla Soup

It's cold outside still. There's supposed to be a blizzard blowing in this weekend. Time to hunker down with something hearty and avoid going outside. I don't really like brothy soups. That's why this tortilla soup has peppers, carrots, onions, chayote squash, beans, chicken, cilantro, green onions and jalapenos.

You will need:
4 chicken thighs
Salt and pepper to taste
1 teaspoon ground cumin
1/4 cup plus 2 tablespoons masa harina
3 tablespoons vegetable oil
1/4 cup diced carrot
1/2 cup diced onion
2 cloves mined garlic
1/4 cup each diced red, green, yellow and poblano peppers
1/4 cup chayote squash
1/4 cup fresh shucked corn
1 can washed and drained black beans
3 tablespoons diced pork fat
3 cups chicken stock
1/4 cup cream
Garnish: cilantro, scallion, cotija cheese, tortilla chips


Start by seasoning some chicken thighs with salt, pepper and cumin. Then dredge them in some masa harina or corn flour...


...and saute them in vegetable oil until brown and crispy. Be careful these are delicious. I started with four chicken thighs but only two made it into the soup. I just ate the others with my hands. Let them cool, dice them and reserve them for later.


While the chicken thighs are cooking, dice half a carrot and two small onions and mince two cloves of garlic.


Then saute them in the oil and use the moisture coming off the vegetables to scrape up all the browned bits from the chicken. This is what chefs refer to when they talk about building flavors.


Then add diced red, green, yellow and poblano peppers...


...fresh shucked corn and chayote squash...


...oregano, red chili flake, cumin and black beans. Everybody in the pool. Just heat through until the black beans start sticking to the bottom. Remove the vegetables and save them in a bowl.


Add diced pork fat and render it until there's enough fat in the pan to make a roux with about two tablespoons of masa harina.


While whisking, add three cups chicken stock and bring to a boil to thicken.


Then add all of the reserved vegetables and beans, what's left of the chopped chicken and quarter cup of cream and bring to a simmer.


Serve with fresh cilantro, scallions, cotija cheese and tortilla chips.

Monday, February 1, 2010

Spicy Italian Sausage with Fresh Fettuccine Puttanesca

I had to break in the new apartment the other day by cooking the shit out of some delicious Italian food. I got the chance to break in my new pasta roller, food grinder and sausage stuffer. Check the pics.


I started with a four pound Boston butt, that's pork shoulder for all you out there who aren't hip to the culinary lingo. I'm making sausage and this cut has the best meat/fat ratio for making sausage. You simply cannot have sausage without the proper meat/fat ratio, it ends up dry, tasteless and sad, like a world without sausage. I also picked up some vacuum packed pork fat, cubed it and mixed it in with the grind because I planned on skinning the shoulder and that takes away some of the fat as well.


I took the meat off the bone and froze it to make pork stock/ramen broth later. I also skinned the shoulder and froze that to make chicharron (drool) later.


Once skinned, I cubed the meat to make it fit down the shaft of the grinder easier. I also seasoned it with salt and pepper. This initial seasoning is crucial to maximize flavor in the sausage. It'll bring out its inner porkiness.


I toasted some classic Italian sausage spices (fennel, coriander) in a dry pan for a few minutes...


...and tossed 'em around...


...until they were nice and fragrant and just started to take on some color.


Then I buzzed them up in my spice grinder. Looks like someone's having fennel flavored coffee tomorrow.


I mixed the ground spices around in the cubed pork and got on to grinding.


I made a rookie mistake by putting the grinding blade on backwards! Oh well, I quickly switched it around and watched my meat get tore up.


The most important step in cooking any food is to taste it. Here's my sample patty of sausage cooking in some olive oil. It definitely needed some more fennel and salt. I also added some more garlic and paprika for color.


Even though I hadn't made fresh sausage in over a year the steps came right back to me. I loaded the casing (hog) that I got at the Italian deli onto the sausage stuffer and got ready to stuff those wieners.


Not too tight!


Look at those links!


Five. Five sausages. Five beautiful, firm, meaty sausages.


Pasta time. As you can tell by the slant of the roller, I didn't really have a place to anchor my new pasta roller so this was a bit of a chore. The pasta dough is semolina and whole wheat for the gf.


Flat pasta sheets. Look ma, no rips!


Here's my cut fettuccine noodles tossed in some semolina to keep them from sticking. Didn't really help cause they stuck anyway.


I simmered the sausage in some red wine, the reduction of which will later become the base for my sauce puttanesca.


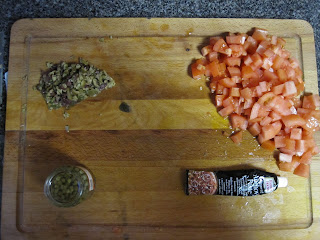
And the rest of the mis en place for the puttanesca. Clockwise from top right. Chopped olives, tomatoes, anchovy paste and capers.


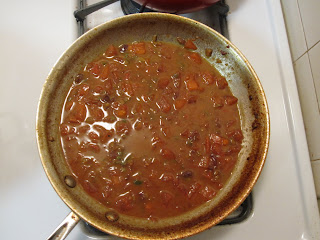
Everybody in the pool.


Here's the finished dish with sliced sausage and fresh grated parmesan.


A view from the top.


I'm a member of the clean plate club.